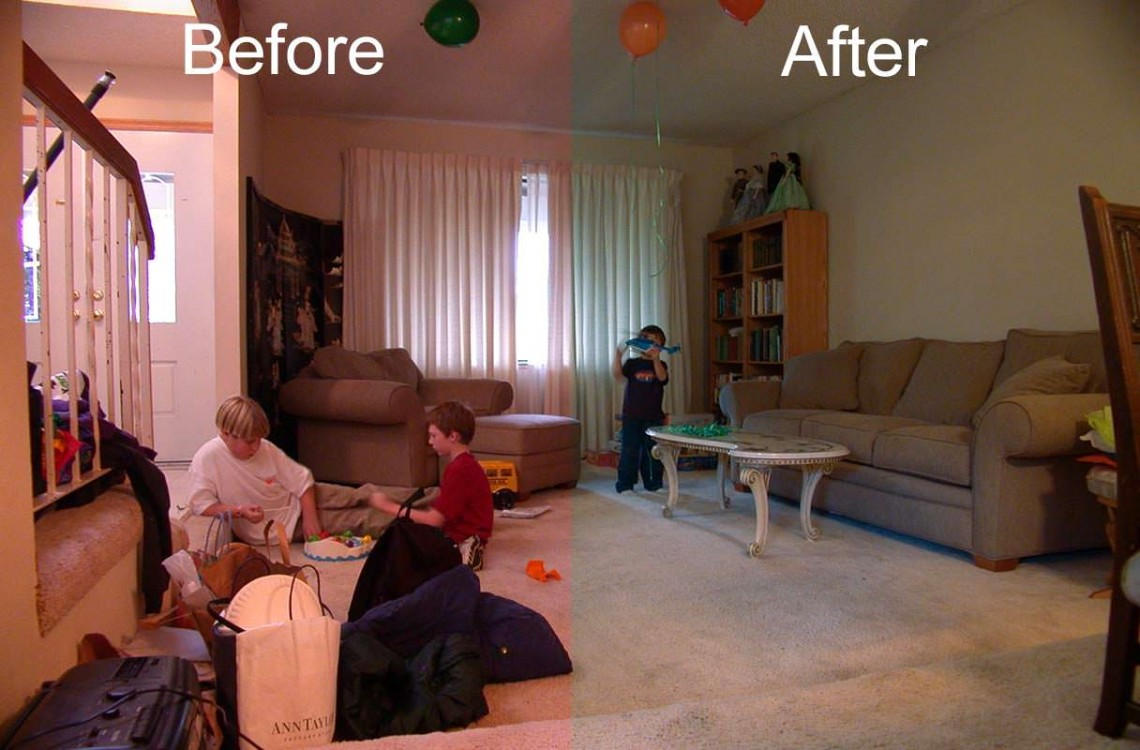
Sometimes the white balance in your images is “right on,” and other times it’s miles off—don’t worry, it happens to all of us, and it’s easy to fix in Photoshop!
Before we dig in to this tutorial, let me first say that it’s always best to try to get your white balance correct in-camera. This results in less post-processing time, and it gives your images a head-start in the event you do need to make some white balance adjustments in post-processing.
These days, virtually all digital cameras have white balance settings. If you’re shooting outside on a sunny day, you would set your camera’s white balance setting to “sun,” and if you’re shooting outdoors on a cloudy day, you would set your digital camera’s white balance setting to “cloudy,” etc.
A lot of the higher-end digital camera also allow you to manually set custom white balance values. To take advantage of this option, you could use one of several devices such as a simple “gray card,” an ExpoDisc, or X-Rite Photo’s ColorChecker Passport.
This tutorial is for those “special times” when you either forgot to set the white balance setting on your camera, and/or you forgot to pack your ColorChecker Passport or other white balance tool in your camera bag before you left for the shoot. Like I said earlier, don’t be to hard on yourself…it happens to all of us, and the white balance can still be easily fixed in Photoshop.
To fix the white balance in Photoshop we’ll be locating and setting the black point, white point and gray point in an image. Each of the color point settings will reside on their own Curves adjustment layer, so you’ll be able to adjust the opacity of each individual layer separately for additional tweaking.
Watch the video
The steps
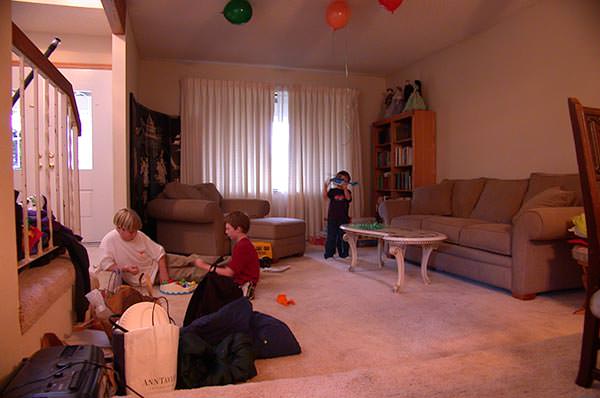
To begin, we’ll locate the black point in the sample image shown below. Feel free to use this image, or use one of your own to follow along with this tutorial.
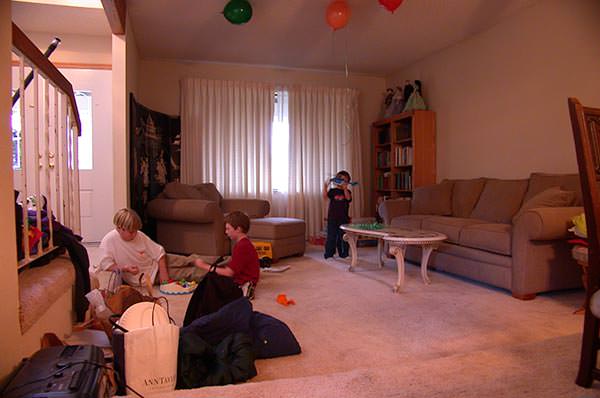
Locate and set the black point
Open the image in Photoshop, and set the Image Mode to 16 bits by selecting Image | Mode | 16 Bits / Channel. Setting your image to 16 bits is optional, but I always work in 16 bit mode to minimize information loss.
Click on the “Create a new fill or adjustment layer” icon, and select “Threshold.”
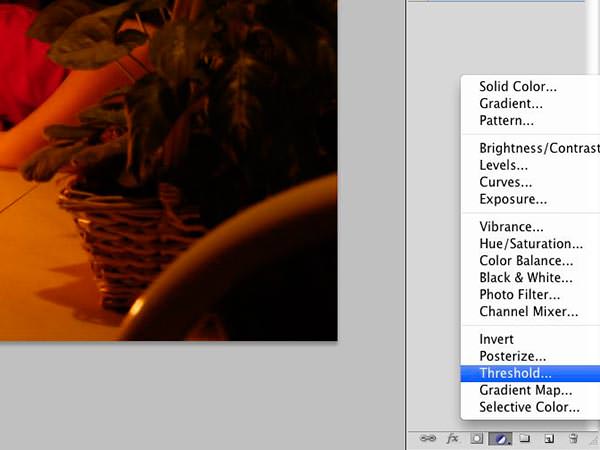
In the Threshold dialog box, move the adjustment slider all the way to the left. Next, slowly drag the adjustment slider back to the right until black areas begin to appear in the image.
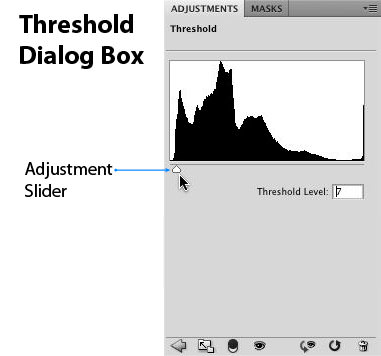
When some people apply this effect, they drag this slider to the right until just a few black dots appear on the screen—this is incorrect because these small black spots typically don’t contain any color information. For example, these black spots are equivalent to RGB 0,0,0—they aren’t actual blacks, they are just void of color, and as such, they are also lacking the color contamination that we are attempting to remove. For this reason, it’s important that you move the Threshold adjustment slider until you can see actual blacks.
So how can you tell when the actual blacks are showing? You can’t be 100% certain, but moving the adjustment slider to the right until you begin to see some “form” in the image is a good start. You can also temporarily turn off the visibility of the Threshold layer by clicking on the eyeball icon—this will reveal the original image, which should give you a good idea of where the blacks are in the image (be sure to turn the layer’s visibility back before you make further adjustments to the Threshold).
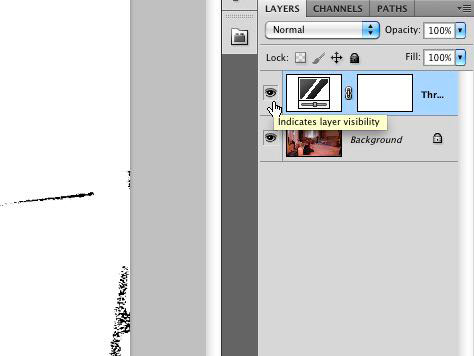
Once you’ve identified some blacks in the image, select the Color Sampler Tool. If you don’t see this tool, click and hold on the Eyedropper Tool, and in the resulting sub-menu, select the Color Sampler Tool. Using the Color Sampler Tool, click once in the area that you’ve determined to be black to set the Color Sampler point. If you happen to miss the spot you were trying to click on, you can drag the point you placed to the correct location by clicking and holding your mouse button down on the point while you drag.
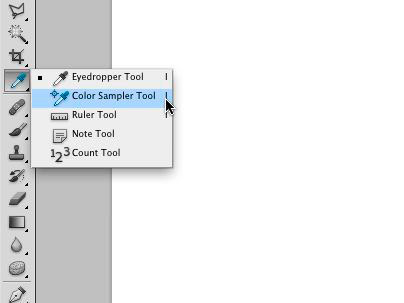
It may be helpful to use the Zoom Tool to zoom in on the image to get a better idea of where you’re clicking. The easiest way to zoom in, is to press and hold the “Z” key while you click on the image with your mouse. To zoom out, press both the “Z” key and the Option key (PC: Alt) while you click.
The next step is to create a Curves layer that will contain this black point. Click on the Curves icon in the Adjustments panel, or use the main menu and select Layer | New Adjustment Layer | Curves.
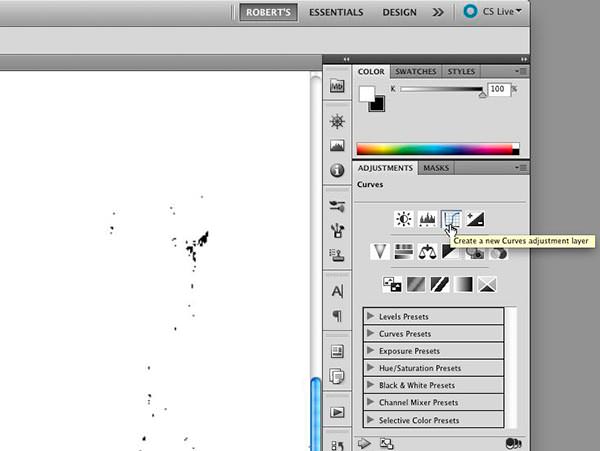
Once the Curves adjustment layer has been added to the layer stack, delete the Threshold layer you created in the previous step by clicking once on the layer to highlight it, and hit the Delete key (PC: Backspace). Don’t omit this important step! Immediately after creating each of our 3 Curves layers, we will need to delete the Threshold layer created in the previous step.
After deleting the Threshold layer, make the upper layer active again by clicking once on it (the Curves layer).
In the Curves dialog box, you will see 3 eyedropper icons. From top to bottom, they represent the black point, the gray point, and the white point.
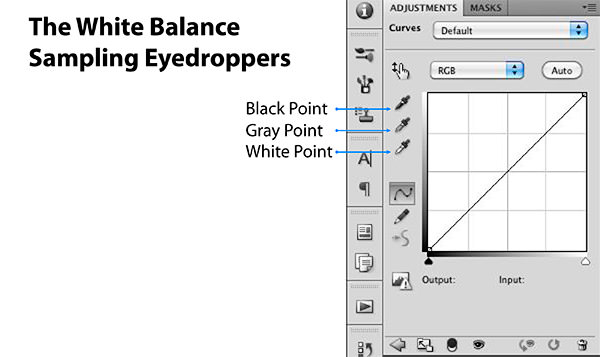
Because we are setting the black point in this step, click once on the black point eyedropper icon to select it. Next locate the Color Sampler point we created earlier and click once directly on it to set the black point. When you do this, you’ll probably notice that the curve shown in the Curves dialog box has changed to reflect the black point change.
It may be helpful to use the more accurate version of the selection tool when trying to precisely click on the Color Sampler point. To use this alternative version of the selection tool, simply turn on the Caps Lock key and you’ll see your cursor change. Note that this handy trick works with nearly all of the Photoshop selection tools.
Locate and set the white point
Click on the “Create a new fill or adjustment layer” icon, and select “Threshold.”
In the Threshold dialog box, move the adjustment slider all the way to the right, then slowly drag the slider back to the left until some white areas begin to appear.
Just like when we set the black point, it’s important that you have true whites appear on the screen. You don’t want the whites from a bright window in the background that may have the whites blown-out—these types of whites aren’t actual whites, and they won’t contain the color contamination that we are trying to remove. The same logic applies to specular highlights found in the catch-lights of eyes or the reflection in glassware—these aren’t true whites.
To help you find a location in the image that may have whites, you can reveal the original image by turning off the layer visibility of all layers except for the background layer. The easiest way to do this is to hold the Option key down (PC: Alt) while you click on the layer visibility eyeball on the background layer. When you’re ready to make further adjustments to the Threshold layer, Option+click (PC: Alt+Click) on the background’s eyeball again to make all layers visible again.
Once you’ve identified some whites in the image, use the Color Sampler Tool again to set another Color Sampler point. To add this Color Sampler point, click once in the area that you’ve determined to be white.
Next create a new Curves Layer by clicking on the Curves icon in the Adjustments panel, or use the main menu and select Layer | New Adjustment Layer | Curves. Once this new Curves Layer has been created, delete the Threshold layer you created in the previous step by clicking on the layer once to highlight it, and hit the Delete key (PC: Backspace).
After deleting the Threshold layer, make the upper layer active again by clicking once on it (the Curves layer).
Because we are setting the white point in this step, click once on the white point eyedropper icon in the Curves dialog box to select it. Next locate the white Color Sampler point we created earlier and click once directly on it to set the white point.
Locate and set the Gray point
Setting the gray point is similar to setting the black and white points as we did earlier, but there’s a couple of intermediate steps we need to make. Start by creating a new layer by either clicking on the new layer icon, or using the keyboard shortcut Shift+Cmd+N (PC: Shift+Ctrl+N).
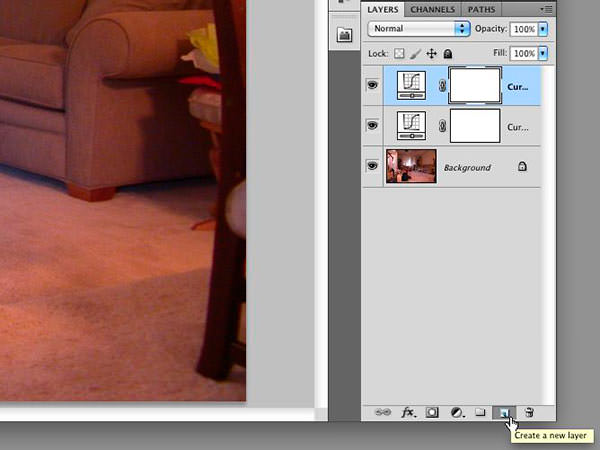
Next open the fill dialog box by using the keyboard shortcut Shift+Delete (PC: Shift+Backspace), and select the option to fill this layer with 50% Gray and click on OK.
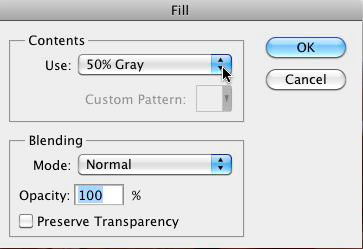
Once this new layer is filled with 50% gray, change the blend mode to Difference.
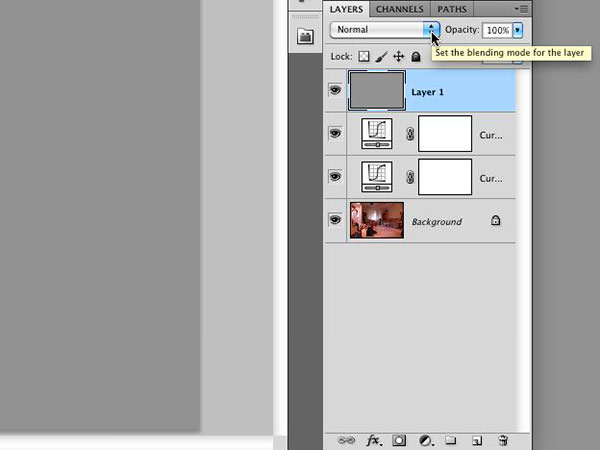
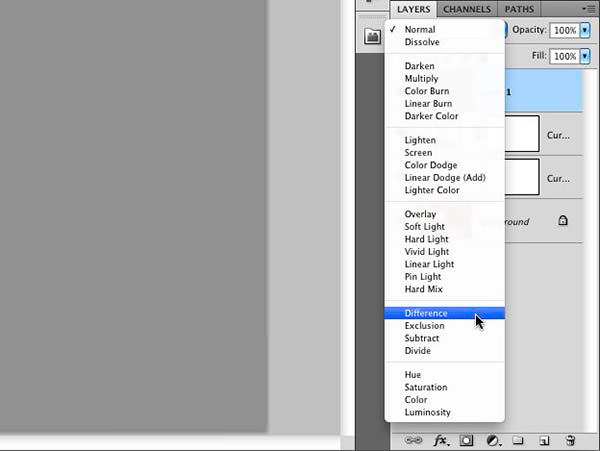
Add a new Threshold adjustment layer by clicking on the “Create a new fill or adjustment layer” icon, and selecting “Threshold.”
In the Threshold dialog box, move the adjustment slider all the way to the left. Next slowly drag the adjustment slider back to the right until gray areas begin to appear. There’s no need to be careful that you select actual grays—because the underlying layer is filled with 50% gray, and its blend mode is set to Difference, the only colors that will appear on the screen will be gray. Because of this, you can stop dragging the adjustment slider when just a few small gray spots appear.
Because the layer is filled with 50% gray, and the Difference blend mode is applied to this layer, only grays will appear when the Threshold slider is adjusted. You can verify this yourself by creating a new Photoshop document. Fill the background layer with black, and then add a new layer filled with 50% gray, and set this layer’s blend mode to Difference. When you do this, the only color you will see will be gray. For more information on Blend Modes and their mathematical formulas, read my article “Photoshop Blend Modes Explained.”
Once again use the Color Sampler Tool to set a Color Sampler point on the area that you’ve decided to use as your gray point.
Next create a new Curves Layer by clicking on the Curves icon in the Adjustments panel, or use the main menu and select Layer | New Adjustment Layer | Curves.
Once this new Curves Layer has been created, delete both the Threshold layer and the layer with the 50% fill that you created in the previous step by clicking once on the layers, and hitting the Delete key (PC: Backspace).
After deleting the Threshold and Fill layers, make the upper layer active again by clicking once on it (the Curves layer).
Because we are setting the gray point in this step, click once on the gray point eyedropper icon in the Curves dialog box to select it. Next locate the gray Color Sampler point we created earlier and click once directly on it to set the gray point.
- Use Cmd+H to hide/show the Color Sampler points (PC: Ctrl+H)
- Delete sample points by Option+Clicking on a sample point with the Color Sampler tool (PC: Alt+Click)
Below is an example of what the layer stack in Photoshop should look like. There should be 3 separate Curves layers, one for each of the white balance color points we set. If you want to make any further adjustments to the image, you have the option of adjusting the Opacity for any of the 3 Curves layers. I should also probably mention that it could be considered a “best practice” to name your layers for easy identification. While I do typically name my layers when working on more complex projects, it’s not really necessary for this procedure. After you’ve done this a few times, and you always apply the color sampler points in the same order, you just “know” which layer is which.
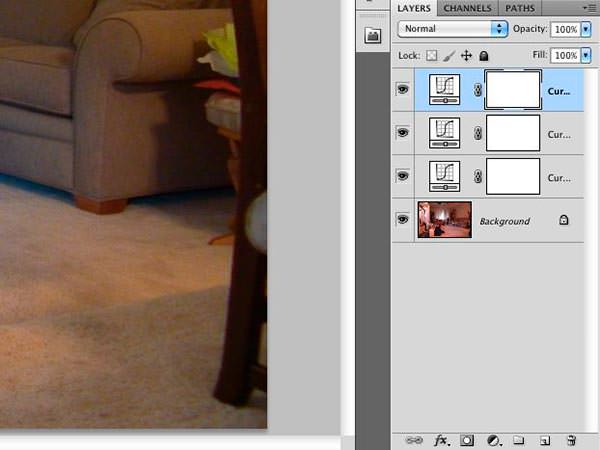
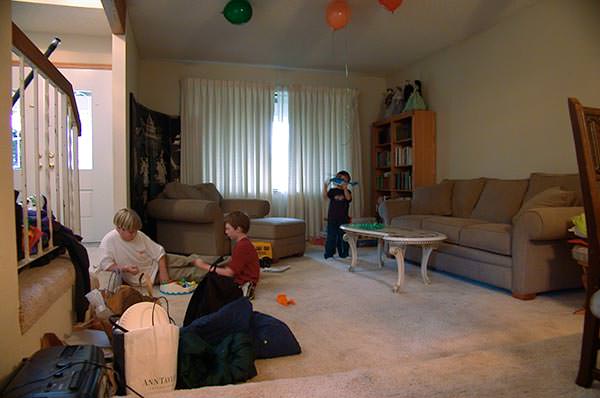
That’s it! You’ve just successfully corrected the white balance for your image!
Before
After
[poet-badge]
Very good tutorial, liked the CAPS-Lock hint and the different curves for white, gray and black point!
Sebastian
Very nice! Couldn’t you use an 18% gray card in your image to select the gray point as well?
Absolutely! As this post mentions:
“A lot of the higher-end digital camera also allow you to manually set custom white balance values. To take advantage of this option, you could use one of several devices such as a simple “gray card,†an ExpoDisc, or X-Rite Photo’s ColorChecker Passport.”
“This tutorial is for those “special times†when you either forgot to set the white balance setting on your camera, and/or you forgot to pack your ColorChecker Passport or other white balance tool in your camera bag before you left for the shoot.”
Thanks for the comment!
Since I have began using Lightroom, I rarely edit photos in Photoshop. I will share this information with my students – I teach free photography lessons – and they will be sure to use the techniques you offer here.
Appreciative,
k/d/morris –
Operation Give Back: Photography (Facebook)
Very helpful. Thanks for sharing. I saved the final PSD to use as a template for future use. No point in creating all the curve layers and such all over again.
I really liked this tutorial. Is there any way that I can do this to a group of pictures or save these curve layers and aply them to other layers that the WB was at the same level?
Yes, you can apply the same settings to other files. You could copy a new file into the existing layer stack, move this new layer/image to the bottom of the stack, and delete or hide the original background layer. Another option would be to make the current background layer a Smart Object. Once the layer is a Smart Object, you’ll have the option of right-clicking on the layer and selecting the option to “Replace Contents.” Depending on how many other images you want to apply these WB settings to, you may even consider creating a Photoshop action. Thanks for the comment Mark!
Thnx for the tutorial, I like it. But I’m not getting it. When you want to set the white balance dont you need an object you *know* is grey in reality? Then by neutralizing its color you can remove a color cast from the image ie correct the white balance. How do you know that the objects you find in the last step are actually grey?
Ideally you would have used the camera’s white balance settings, a gray card, ExpoDisc, or ColorChecker Passport to set your white balance accurately. However the goal of this tutorial is to show a way to adjust the white balance when you didn’t use one of these options. As to how it works, after finding the black and white points, you get the grey point via a combination of a layer filled with 50% gray, and using the “difference” blend mode. Because the layer is filled with 50% gray, and the Difference blend mode is applied to this layer, only grays will appear when the Threshold slider is adjusted. You can learn more about blend modes by reading my article “Photoshop Blend Modes Explained.”
Thank you for the comment Jos!
Hello. I stumbled upon your article looking for some info on how to set the white balance only on specific areas of the photograph in scenes with mixed light sources. I read in different places that the digital image can have the white balance set according to only ONE light source/colour temperature, thus making areas lit with other sources having the incorrect white balance. Is the method presented in your article giving the correct white balance over the whole image? My presumption is yes. Very interesting article. Thanks!
Hi Axelanti. Yes, this this technique would apply to the entire image.
Images with mixed lighting, e.g., florescent on one side and incandescent on the other, can be tricky to fix. In situations like this you can try jumping the layer (duplicate it). On one layer correct the white balance for the florescent lighting. In the other layer correct the white balance for the incandescent lighting. Then try blending the two images together by adding a white layer mask to the top layer, and applying a black gradient to the mask. Where you place black on the white mask, the corresponding area in the layer below will show through. Instead of applying a gradient, you could also just paint on the mask with a soft black brush.
Thanks for the comment!
Thanks! just saved my Butt at work!
Great!
I can’t figure out what I’m doing wrong, but I cannot get the grey point instructions to work for me. Help? :/
Hi Julie.
Can you give me additional information on the problem you’re having? I also recommend reading the article and watching the video. One or the other may resolve the problem you’re experiencing.
At the end of this technique for setting white balance is it recommended to merge the 3 curves layers with the copy of the background? If not what would you do to continue working on the image?
Hi Brandee. It’s really up to you.
I typically save my image as a jpg using “Save for web.” I then save it as a layered PSD for future work if needed.
Perfect tutorial. Spot on white balancing and so easy to follow. Thank you 🙂
Thanks for the comment Jacob!
Excellent article on white balance. I tried this and it worked for me most of the time. But some time it is changes total color tone of the image after setting gray point. This is particularly happening with images which doesn’t have gray color. Is there any way to overcome this problem in image where there is no gray points?
Hi Anil.
There’s a couple of additional steps you need to take when setting the gray point (steps you don’t take when setting the white and black points). Are you sure you’re following the correct steps to set the gray point?
Hello
A great tutorial for accurate white balance. However, on any other tutorial I’ve read on this subject it is done on the levels layer, and not on the curves layer. Is there a specific reason you’re not using levels?
Hi Rotem.
There’s no particular reason I’m using curves instead of layers—both techniques do the job. I do however think finding the gray point is faster using this method.
Thanks for the comment!
Hi Robert,
This is excellent article and really helped me after hours of trying to figure out how to make my images consistent. I was rushed on an assignement and could not do proper white balance correction in the camera. Anyway. I followed the steps, all ok. Now I am replacing content on the Smart Object Background, but I have a problem when switching between landscape and portrait orientated images. The canvas does not change so I end up with half of image. I tried rotating but did not help, the whole image rotates…Any advice? Thank you. JO
Thank you so much! I was just editing some photos for my blog and felt like something was a little off…a little too much green in the image. So, I used your tutorial, and my photos are a million times better! So subtle, yet very effective. I appreciate this detailed tutorial.
I wonder what options there are when you have an image of known colour temperature and you don’t want to fudge it. Say you have a screen capture of a DVD that is mastered at 9300K and you want to correct it to 6500K?
I am just starting to learn photoshop and the pacing and information you gave was so helpful! Thank you!
Glad to hear you found the article helpful.
Thanks for the comment Carol!
Hi, thanks for the info. Very useful. I’m not quite sure why you are using three Curves adjustments instead of one only containing black/white/grey adjustment…
This is a fantastic tutorial given all the notes on best practices, keeping things organized, and shortcut keys. Thank you!!
Really nice tutorial, appreciated, thanks!
This method is only an approximation. If there is no real gray pixel in an image, the first pixel to emerge in
threshold is not gray. It may be very close to gray or far away, So. this method is not perfect.
Once You shot an image, there is no way to restore original colors, if in an image there is no a singe gray pixel.
It can be very close but, not original colors.,
I agree with Zoran on this one and Jos Van Riswick made a sensible comment as well.
The 50% Gray difference + Threshold layers only show you what the computer sees as being gray. This means that if a color-cast has turned some of the pixels into a perfect gray, they would erroneously show up. However, by combining knowledge of the scene’s gray values + this technique, things are better than just eyedropping from memory. Conclusion: this technique is great to back up or confirm one’s knowledge of the scene. I think that is someone is “that” versed into having exact WB control (such as in the film industry), one would surely shoot a gray card in the scene! If there is one remark to be made, it’s that the title of the article should be “Precise WB adjustments..” instead of “Accurate WB adjustments…”. Thanks for a nice article. I am trying to automate this process – any pointers?
This is the best tutorial I’ve seen as far correcting white balance. Though I have a problem applying to my photos. I have the Photoshop CS6. Now what happens is the following. I go as far the last step picking the gray. When I get to pick the threshold for the gray I do not get the graph like in your video filled only the half of it, so I can’t finish the procedure. Notice: I follow your tutorial to the letter. I welcome any help you can give me. Thank you
Hi Spiros.
Is the layer with your original image visible? If you toggle the visibility of your original layer off (the one with the image), you won’t see the graph in the Adjustments > Threshold dialog window.
Thanks for you comments regarding the tutorial!
Thank you so much,, this is by far the best and most accurate way of doing this.. Much more than randomly playing with the color sampler tool. I have one question.. There are times when I take many photos in the same light condition.. When I have dozens of pictures at the same place, I would definitely want an easy way of doing things. I love the result of this method of getting the correct white balance, but if I choose to apply this individually to numerous pictures, the work load would be so heavy.
So I was wondering. If I work on one picture using this method, can I convert the result to certain value of color temperature and tint, so that I can more easily apply the same value to other pictures in Adobe Camera Raw?
Thanks a lot !
Hi Changeun.
Yes, you can apply the white balance settings of one image to a different image. First make the layer that has your original image a Smart Object. Then Right-Click on (or near) the Smart Object layer name and select the “Replace Contents” option. Select the new image you want to use, and click on “Place.” You can find an example of this in my Creating a Decorative Photo Frame in Photoshop tutorial.
Thanks for the comment!
Thank you!! I am deeply obliged! That works just fine !!
Great step-by-step instructions that really work. Thank you!
Thank you Flick Guy!
Thank you. This is a very informative tutorial. Do you happen to have any suggestions on converting color photos to black and white using the same principles of setting the black, white, and gray color levels?
Brilliant tutorial. Thanks! I’ve never seen this method before but it’s better than anything I’ve ever used.
Thanks Laura. I’m glad you found the technique useful!
Extremely helpful and perfect white balance technique. You can also manipulate the curves to dial it in exactly. Thank you for sharing.
I really liked this tutorial. Is there any way that I can do this to a group of pictures or save these curve layers and aply them to other layers that the WB was at the same level?
Hi Brian.
Yes, you can create a Smart Object, and then do a “Replace Contents.” An example can be found my article Creating a Decorative Photo Frame in Photoshop in step 6b.
Wow, this tutorial was so helpful! Thank you. I have some moderate color blindness issues, so I often don’t see incorrect color casts that others can see. This will definitely help me get the color balance right!
Thanks so much! I struggle with white balance. All. The. Time. This is fantastic! Very helpful in saving my photos with Santa!
Glad to hear you found the tutorial helpful Melissa!
If you use the levels approach, you can alt click the auto button. This then takes you to a new menu where you can select the algorithm. Do you essentially get the same white and black points if you choose “find dark and light colors”? You can also adjust the clipping percentage, which would address the 0,0,0 problem. Even though these look like statements, they are really questions 🙂 Secondly, wouldn’t these points change image to image even if shot under same light? Thanks!
It is extremely helpful for me. Thank you for taking the time to discuss this, white balance adjustment in photoshop. I feel strongly about it and love learning more on this topic. If possible, as you gain expertise, would you mind updating your blog with more information.
I agree. Fantastic tutorial! The thing I appreciate the most is that you also explain why you are doing something instead of just saying, “Do this.” Thank you!
I do have two questions though ….
1) I’m not clear on why you need to delete the Threshold layer before you set the eyedropper on Curves.
2) Someone asked this before and it didn’t get answered. What can’t you set the three eyedropper points in the same Curves layer? Why do you need a separate layer for each point?
Thanks for your time!
Mike
At last, I find my question answer. You share a lot of details in your post. Thanks
I am always following your website to get ore kind of valuable resources
This was amazingly helpful and a resource I’m sure I’ll come back to many times! Thank you 🙂
Sorry to bother you directly but I’m working on an automation project and I’m intrigued by your method in This Blog:https://photoblogstop.com/photoshop/accurate-white-balance-adjustments-in-photoshop
Yours is the First Blog or explanation of doing the balance adjustments and doing the curve adjustment right after picking the location. I.E. Create layer, find location, open Curves, pick Black location from earlier. Repeat for White and Gray.
All of the rest of the discussions I have come across on the web have you picking the Black and the White locations from the original print and then adjusting them with Curves before doing the Gray.
In my rudimentary testing I see by doing them together based on the original photo there appears to be a Total Colors difference in the Finished Image as opposed to adjusting Black first and then picking the White location. For automation purposes your method actual works better and I am done with the Black and White process. I was just curious if you had any input on you method vs others as far a color depth.