The following is a simple but effective technique for adding morning sunbeams to your images. For this technique it’s best to start with an image that has the sun rising up behind trees, through fog, or through some other subject. Look for a photo that makes you think to yourself “Geez, I wish I captured those sunbeams I saw when I took this picture!” That being said, let me also mention that it’s always best to capture your sunbeams in-camera—but when you miss’em, you can always fall back on this technique.
Below is the image I used for this tutorial. The image has already been enhanced by applying a custom DNG profile created using X-Rite Photo’s ColorChecker Passport. I also adjusted the contrast, applied a bit of warming to give it more of that “early morning” look, and sharpened the image for display on a screen.
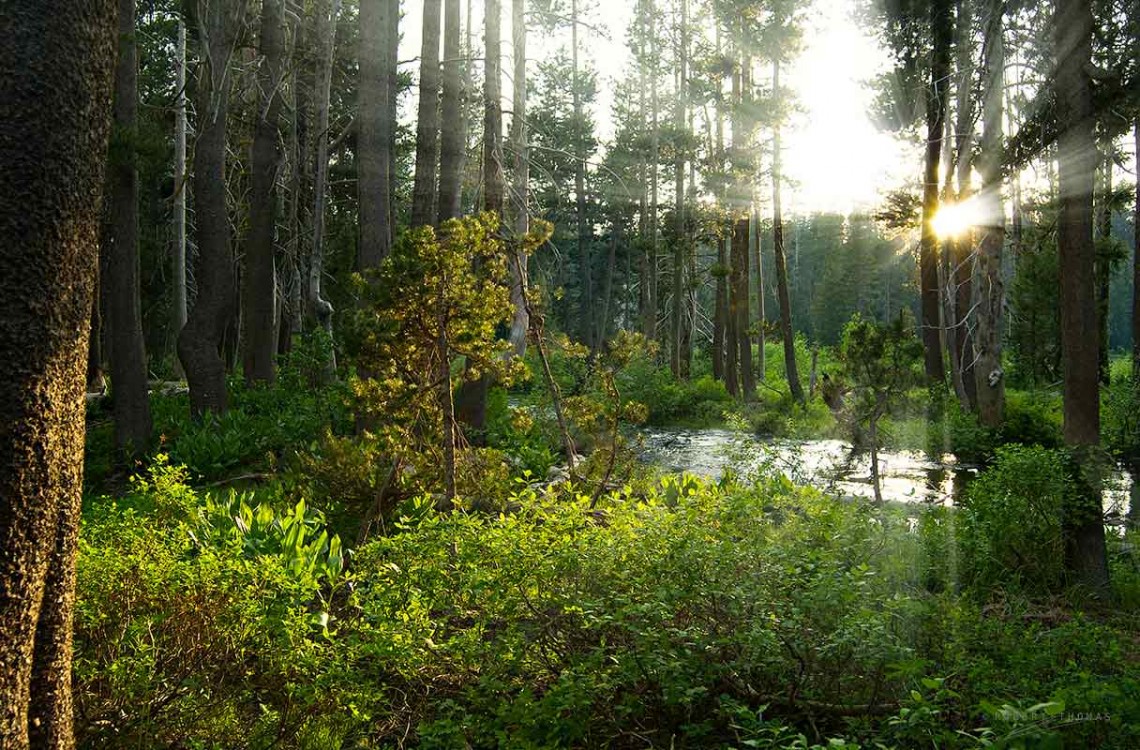
The image without sunbeams

The image with sunbeams

Watch the video
The steps
Quick steps for advanced Photoshop users
- Duplicate the Color Channel with the most contrast between the sky and the trees.
- Fill this channel with Black and set the Blending Mode set to Overlay.
- Fill this channel again with White and set the Blending Mode set to Overlay.
- Repeat the last Fill 2 to 3 more times until all of the grays turn white.
- Cmd+Click [PC: Ctrl+Click] on the layer to load it as a selection.
- Create a new layer and fill with White and the Blending Mode set to Normal.
- Cmd+D [PC: Ctrl+D] to deselect.
- Apply a Radial Blur set to 100%, Zoom, and Best.
- Apply an Outer Glow set to Soft Light, 100% Opacity, Default Yellow, and Size of 5px.
Select an image
Select an image that already has the sun peeking throuth objects.
You may want to postpone sharpening the image until after the sunbeams are added. Because I prefer softer sunbeams, I applied sharpening before adding the sunbeams.
Select a color channel
Open the image in Photoshop, and cycle through the various color channels to determine which channel has the highest contrast between the sky and the trees (or other objects in your image).
Duplicate the color channel
For the image I’m working on, this was the blue channel. Click and drag the best channel to the “Create New Channel” icon to create a duplicate channel. If you selected the blue channel like I did, this new channel will be called “Blue Copy.”

Fill the duplicate color channel
With the duplicate color channel selected, select Edit > Fill (or use Shift+Delete). Set the “Use” color to Black, the “Blending” mode to “Overlay,” and “Opacity” to 100%. Click “OK.” This will force any of the darker gray areas to black.

Fill the duplicate color channel again
With the duplicate color channel still selected, select Edit > Fill again. This time set the “Use” color to White, leave the “Blending” mode set to “Overlay,” and “Opacity”set to 100%. Click “OK. This will make most of the gray in the sky turn white. You may need to repeat this step two or three more times to convert all of the grays to white. This technique will only affect the light gray areas of the image, and should leave the black areas alone.
Load as a selection
Cmd+Click (PC: Ctrl+Click) on the duplicate channel to load it as a selection—this will only load the white areas of the channel as a selection. When you do this, you will see the “marching ants” appear on the image.
Create a new layer
Return to the Layers panel and create a new empty layer above the current working layer by pressing Cmd+Shift+N (PC: Ctrl+Shift+N), or click on the new layer icon.
Fill with white
With this new layer selected, select Edit > Fill once again. In the Fill dialog box, set the “Use” color to white and change the blending mode to “Normal,” and click “OK.” Hit Cmd+D (PC: Ctrl+D) to deselect the selection (removes the marching ants).

Adding sunbeams
We’re ready to add the sunbeams using the Radial Blur function in Photoshop, but first let me mention that as of Photoshop CS5, there’s still no preview for your selection in the grid, so you’ll just have to give it your best guess and review the results after clicking on “OK.”
The easiest and most accurate way to get the blur aligned properly is to run an intermediate Blurring step before adding the actual sunbeams.
The easiest and most accurate way to get the blur aligned properly is to run an intermediate Blurring step before we add the actual sunbeams. To do this be sure the new layer is still selected, and select Filter > Blur > Radial Blur. In the Blur dialog box, set the Amount to 10, the Blur Method to “Spin,” and the Quality to “Draft.”
Next drag in the grid to move the center point to the correct location on the blur grid (give it your best guess). Click “OK” when you think everything set setup properly. Once the blur has been applied, you’ll see how good you did on your guess for placing the blur.

If you got it right the first time, congratulations! Use Cmd+Z (PC: Ctrl+Z) to undo the application of the Spin blur and go back to Filter > Blur > Radial Blur. This time set the Amount to 100%, the Blur Method to “Zoom,” Quality to “Best,” and click “OK.”
If you didn’t get the blur positioned properly the first time, hit Cmd+Z (PC: Ctrl+Z) to undo the application of the Spin blur, go back to Filter > Blur > Radial Blur, and try dragging the center point in the grid to a different location. Click “OK” and view the results. If you still got the positioning wrong, repeat this procedure until you get the center point where you want it. If you did get the positioning right, use Cmd+Z to undo the application of the Spin blur and go back to Filter > Blur > Radial Blur. Set the Amount to 100%, the Blur Method to “Zoom,” Quality to “Best,” and click “OK.”
Once you’ve applied a satisfactory blur, you may notice that the sunbeams look a little rough and faint. Reapply the blur one or two more times by pressing Cmd+F (PC: Ctrl+F) until you get effect you’re looking for.

Apply Outer Glow layer style
Next enhance the sunbeams by applying a layer style. Click on the fx icon to open the Layer Style dialog box and select “Outer Glow.”

In the Layer Style dialog box, select the “Preview” check box, and set the blend mode for this effect to “Soft Light,” and set the Opacity to 100%. The default yellow color will work fine for this effect. Set the size set to 5px, or increase it if you want a softer glow. This is a great time to experiment, so explore the other settings for the blend mode, opacity, etc. Click “OK” when you’re done making your selections.

Duplicate the layer (optional)
If the sunbeams aren’t intense enough, try “jumping” (duplicating) the layer by using Cmd+J (PC: Ctrl+J). This will double the effect. If the effect is too strong after jumping it, you can always lower the opacity of the layer.

Clean-up
You may notice that some of the sunbeams are rolling over the front/shady areas of the trees, which makes the entire sunbeam effect look artificial. To correct this problem, add white layer mask and paint over the problem areas using a soft black brush (be sure the mask is selected before you start painting).

To paint on the mask, first click on the mask, then hit “D” to load the default color pallets, then hit “X” to reverse the color pallets, then hit “B” to select the Brush Tool. Set the “Opacity” and “Flow” for the brush to 100% and begin painting on the mask.
Duplicate the mask (optional)
If you choose a brush flow setting below 100%, or if you are using a Wacom tablet, you might want to double the intensity of the layer mask by copying it to other layers that don’t already have a mask. To copy a mask, Option+Drag the finished mask to one of the other sunbeam layers. Don’t forget you also have the option of manipulating the mask using the Mask dialog box.

That’s it! Feel free to experiment with different layer opacity settings to get the desired effect.
The Final Image

[poet-badge]
Really nice tutorial… I love this effect and will try it out for myself. Thanks for sharing.
Thanks Ed! Glad you enjoyed it!
Very Nice Tutorial..
I have read your blog post and it was really helpful for me. I will definitely visit your blog again for read more contents. I will also share on my social media page of any helpful post 🙂
Okay,, its simple and make image more realistic.. thanksss..
I have to browse your journal post and it had been very useful on behalf of me. I will be able to undoubtedly visit your journal additional} for browsing more contents. I will be able to conjointly share on my social media page of any useful post. Thanks for sharing this good post.