Processing a series of images for HDR requires a variety of steps, and processing multiple images for a panorama requires another of set of steps. So how do you create a multiple image panorama that was also shot for HDR processing? In this tutorial I’ll discuss how to accomplish this using Lightroom, Photoshop, and Nik Software’s HDR Efex Pro 2.
Capturing images for the HDR panorama
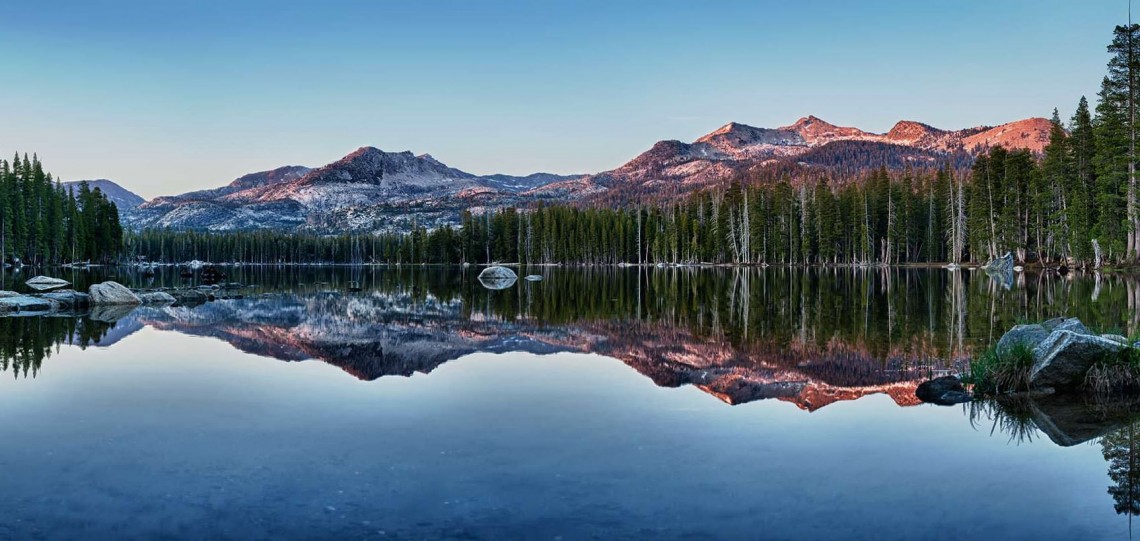
The image shown below is one of the finished HDR panoramas I created. The panorama was built using 14 images that were stitched together in Photoshop. That’s a lot of images to stitch together, but this is primarily the result of my shooting in portrait mode (as opposed to landscape). But wait, there’s more! Each of these 14 images/quadrants were also captured using 5 different exposures for HDR processing. That’s a total of 70 images and a lot of post processing to do!
The final HDR panorama.

The steps
Quick steps for advanced Photoshop users
- Create one panorama for each of the exposure values shot.
- Create an HDR image using each of the panoramas.
Create the panoramas
First create the panoramas—the HDR processing will come later once all the panoramas are created. Create one panorama for each of the exposure levels you shot.
For example I took 5 exposures of each of the 14 images that will make up the panorama, and the exposures were bracketed at -1.3EV, -0.7EV, 0EV, +0.7EV, +1.3EV. I first stitched together all of the -1.3ev images into one panorama, and then all of the -0.7EV images into another panorama, etc. The end result was 5 panoramas that differed in 2/3 stop increments.
I recommend you make any post-processing image adjustments after your images have been stitched into the final panorama. If you need to make adjustments prior to stitching, be sure to apply the same adjustments to all of the images that will comprise the final panorama.
To create the panoramas, select the series of images (for a given EV) in your application and use one the following menu options to merge them into a panorama:
- Adobe Photoshop Lightroom: Photo > Edit In > Merge to Panorama in Photoshop…
- Adobe Bridge: Tools > Photoshop > Photomerge…
If you’re doing this directly in Photoshop you would use File > Automate > Photomerge, and then select the images.

Regardless of which of the above applications you use, the Photomerge dialog box should appear. For the above image I selected the “Spherical” method, but you may need to use a different method depending your image.
I recommend doing some tests with the various Photomerge methods to determine which method works best for your image.

Creating the final HDR image
I’ll be using Adobe Photoshop Lightroom and Nik Software’s HDR Efex Pro 2 in this example.
If you’re following along using a different application, you should be aware that HDR Efex Pro (version 1), Photoshop, and Adobe Bridge will require all of the panoramas be the same size (dimensions). If you’re using one of these applications and your panoramas aren’t exactly the same size, you’ll need re-size the images before you do the HDR processing. You can do this in Photoshop by opening each image and increasing the Canvas size (not the image size). Document the size of each of your panoramas, and pick a new canvas size that is larger in width and height than any of your images. Don’t worry about making the new canvas size too large—you can always crop it later.
Select your 5 panorama images in Lightroom, right-click on one of them, and select Export > HDR Efex Pro 2.

HDR Efex Pro 2 will launch and the following Merge Dialog box will appear.

If your images aren’t the same size you’ll see the following message in the upper left corner of the Merge Dialog box. HDR Efex Pro 2 will handle cropping the images for you—this is one of the new features in this version.

If you’re working with JPG images that have had the metadata stripped, they won’t contain the original exposure information, so you you’ll also have to tell HDR Efex Pro 2 what the original EV spacing was. For example if the original exposures were -1.3EV, -0.7EV, 0EV, +0.7EV, +1.3EV, you would select 2/3 spacing as shown below.

For this image I deselected the “Ghost Reduction” option. I did this because I knew it was a very still evening when the photos were taken, so the trees and bushes weren’t moving around. I also noticed that when the Ghost Reduction was enabled, I got some unwanted artifacts in the preview image. More often than not you would enable this option.
If you need to adjust the “Chromatic Aberration” or “Ghost Reduction” adjustments, there’s a very handy loupe function you can use. Just click on the small magnifying glass in the lower right of the preview image to enable it. You can then drag the loupe around the image, and it will automatically zoom in to the areas you want to inspect for chromatic aberration or ghost reduction.
For this image I left the “Alignment” option enabled, and the “Chromatic Aberration” setting enabled and set to the default settings.
Once you’ve set the options required for your image, click the “Create HDR” button to open the main HDR Efex Pro 2 window.
Most of the options in the main window are self-explanatory, especially for those of you that are familiar with other Nik Software applications and plugins. However I would like to explain the options in the Tone Compression section because this is the area that manages the HDR processing algorithms.

HDR Efex Pro 2 Tone Compression Options
| Tone Compression Options | |
| Tone Compression | Moving this slider to the right will darken the highlights and lighten the shadows in the image. Moving the slider towards the left will have the opposite effect. When the slider is positioned at the far left (-100%), the image will look like a single image exposure. |
| Method Strength | Controls the strength of the HDR Methods directly below the slider (Depth, Detail & Drama). Initially setting the Method Strength high (75-85%) helps you see the effects when the 3 HDR Methods are adjusted. Once you finish making your adjustments in the HDR Method section, you can return to the Method Strength slider to fine-tune the strength of the applied methods. |
| HDR Methods | |
| Depth | Add or subtracts the visual cues that give the image more dimension. This is done by accentuating the shadows and adjusting the contrast around objects. Setting the Depth to Off will give the image a flat dimensionless appearance. |
| Detail | Adds or subtracts detail in the image. This setting ranges from a soft blurry effect (Soft) to a grungy effect (Grungy). |
| Drama | Often used to add a unique style to the image. This setting is also found in Nik Software’s Snapseed application. The algorithm originally got its name from the way it would add “drama” to clouds. |

Once you’re happy with the adjustments you made in the main window, you can save your settings as a “Custom” preset, or click on the “OK” button to save your changes and return to Lightroom. The new 16bit HDR TIFF file will automatically be imported into Lightroom.
Are you a fan of Smart Objects?
You have the option of creating a Smart Object if you access the “Merge to HDR Efex Pro 2” option from within Photoshop. Creating your HDR image as a Smart Object will allow you to reopen the HDR Efex Pro main window and readjust your HDR settings. I’m a huge fan of Smart Objects, and I nearly always use them. However one downside of working with Smart Objects is that the file size is always larger than a non-Smart Object (rasterized). Usually this isn’t a big deal, but in the case of this panorama, the resulting 32bit image (as a Smart Object) was 2GB in size!
Want to save the 32bit version of your file?
If you would like to save a 32bit version of your HDR file, start your HDR processing from within Photoshop (mentioned above). Just open Photoshop and select the “Merge to HDR Efex Pro 2” option from within Photoshop. When you get to the Merge dialog box be sure to select the “Smart Object” option. Once you’ve finished making your changes in the main HDR Efex Pro 2 window, and you’re back in Photoshop, the image will be in 32bit mode and the layer will be a Smart Object. To save as a 32bit file simply save the file as a TIFF, PSD or Large Document Format—the file will remain 32bit, and the layer will remain a Smart Object (be sure “Layers” is selected before you click on “Save”). If you prefer to save some disk space (and lose the option to re-edit your HDR settings), you can change the Smart Object layer to a rasterized layer by right-clicking on the layer and selecting the option “Rasterize Layer.”
Is processing all of these images worth the trouble?
You may ask yourself if processing all these images is worth the trouble. For myself I would say undeniably “Yes.” I love to shoot both HDR images and panoramas, and using this technique gives me the ultimate flexibility when creating high resolution and highly dynamic panoramas.
[poet-badge]
Do you find Nik does the best job at creating the HDR effects you like? I haven’t tried it but have tried Photoshop’s buil-in HDR feature and Photomatix. Both are just OK in my opinion from a UI perspective. They get they job done but could be better. The Nik UIs you’ve shown look like a step up.
I use both Nik Software’s HDR Efex Pro 2 and HDRsoft’s Photomatix, but I prefer HDR Efex Pro’s UI.
As far as a preference regarding the results of these two HDR tools, it really depends on the effect I’m looking for. I do however find myself using HDR Efex Pro about 90% of the time.
You can always download a trial version of HDR Efex Pro 2 and evaluate it yourself. The following link will give you a 15% discount if you decide to purchase it: http://goo.gl/ftpSJ
Thanks for the comment!
Hi yea,
I am interested in how you managed to get the image so sharp. I find doing hdr and trees a pain as the trees get a bit soft with crap detail. Is there any trick you did to achieve focus and sharpness on the trees, I know the shoot was a few years ago but can you remember what you focused on, was it infinity?
Hi Bill.
No tricks per se. In the ideal setup you would have no wind, use a steady tripod, and remote trigger. For landscapes you typically want a lot of DOF, so on a full-frame camera you would typically shoot at around F/11. On a cropped sensor shoot at F/8 or F/9. If you shoot a cropped sensor camera at F/11 or more, the image will appear soft and not as sharp. In post processing when I generate the HDR image, I usually make use of the Alignment and Ghost Reduction options (though in some cases these can make the image less sharp). The images that were combined to make the final HDR image were shot using a Nikon D700 with a 50mm f/1.4 lens. Exposure was 1/10s at f/11 and ISO 200. The focus was most likely set to infinity.