In this tutorial you’ll learn how to add a moon to your image, and use luminance blending to realistically blend the object into your image. We’ll even be able to move the clouds in front of the moon!
This tutorial can also be used to place any other type of object in your image. For example you could place a sun, bird, tree, etc.
Watch the video
The Steps
Quick steps for advanced Photoshop users
- Place your moon image to your destination image.
- Adjust the “This Layer” slider in the Layer Style dialog box to mask out the background around the moon.
- Adjust the “Underlying Layer” slider in the Layer Style dialog box to bring the clouds in front of the moon.
Place the moon image in your destination image
In Photoshop, open the image you want to place the moon into.
Click on File > Place, and select your moon image. Click on “Place” to add your moon image as a new layer in your destination document. Press the Return key (PC: Enter) to accept your changes.
Move the moon to a suitable location
Press and release the “V” key to select the Move tool and drag the moon to a location that suits you.
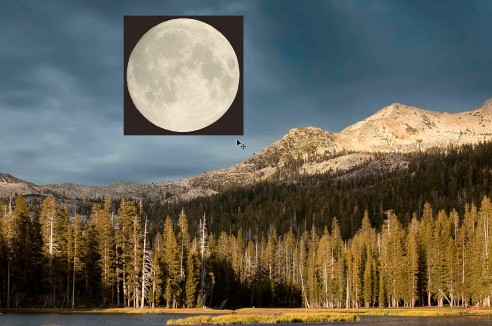
If your moon image has a dark background like mine, you could probably change the blend mode for the layer to Lighten or Screen to remove the dark background surrounding the moon.
Conversely if your moon has a light background, you could probably change the blend mode of the layer to Multiply or Darken to remove the light background surrounding the moon.
I want to show you how to use luminance blending, so for the sake of this tutorial leave the blend mode set to normal. For detailed information on Photoshop Blend Modes, read “Photoshop Blend Modes Explained.”
Mask the moon’s background using luminance blending
Open the Layer Style dialog box by double-clicking on the moon layer—click anywhere to the right of the layer name (don’t double-click on the name).
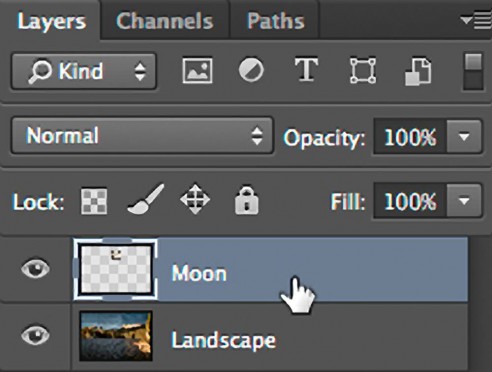
If your moon image has a dark background like mine, drag the left slider in the “This Layer” section to the right until the background disappears. Don’t move the slider too far—stop dragging as soon as the background disappears.
If your moon has a light colored background, you would drag the right slider to the left.
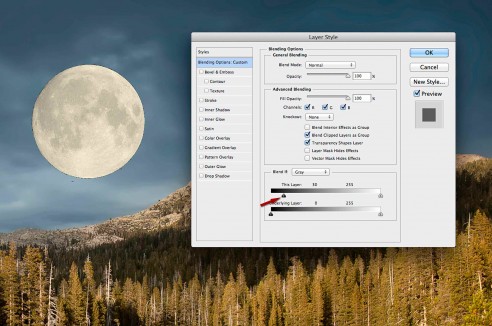
In the illustration above you can see that I moved the slider to the right, and the value for this slider has changed to 30. This tells Photoshop that for the current layer, luminance values of 30 or lower should be masked-out and be transparent.
Fine-tune luminance blending
While still in the Layer Style dialog box, press and hold the Command key (PC: Control) and click on your image to zoom in.
You’ll probably notice some artifacts around the perimeter of your moon.
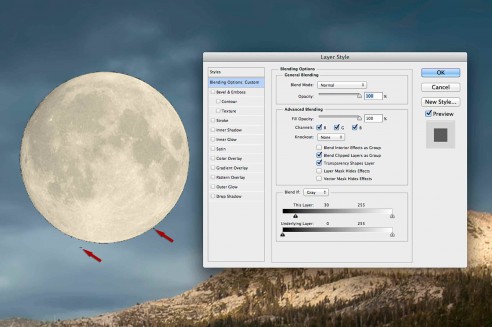
To remove these artifacts, Option+Click (PC: Alt+Click) and drag the right half of the slider you just moved—drag the slider to the right. This effectively splits the slider into two pieces. Continue to drag this half of the slider to the right until the artifacts disappear, and click on OK to accept your changes.

In the illustration above you can see that I moved the right half of the slider to the right, and the value for this slider has changed to 109. This tells Photoshop that for the current layer, luminance values between 90 and 109 should gradually be transitioned from transparent to opaque for a smoother effect.
View the entire image
Zoom out a bit to see the entire image.
To zoom out, press and release the “Z” key, and hold the Alt key (PC: Option) while you click on your image.
Re-size the moon
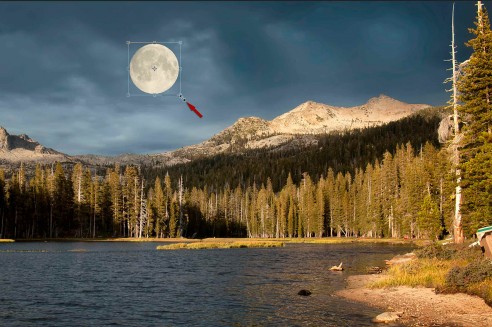
I need to make the moon smaller because it’s looking too large for the scene that I’m working with.
To re-size the moon, select the moon layer and use the keyboard shortcut Command+T (PC: Control+T) to open the Free Transform tool.
Re-size the moon by holding the Shift key while dragging one of the corners. When the moon is about the right size, release the Shift key and mouse button, and press the Return key (PC: Enter) to accept your changes.
Move the clouds in front of the moon
The image I’m working with has clouds in it, and the moon looks artificial because it’s in front of the clouds; some of the clouds should be floating in front of the moon. We’ll use luminance blending again to move the clouds in front of the moon.
Open the Layer Style dialog box again by double-clicking on the moon layer—click anywhere to the right of the layer name (don’t double-click on the name).
If your clouds are darker than the moon, drag the left slider in the “Underlying Layer” section to the right until you start to see some of the clouds appear on top of the moon.
If your clouds are lighter than the moon, drag the right slider in the “Underlying Layer” section to the left until you start to see some of the clouds appear on top of the moon.
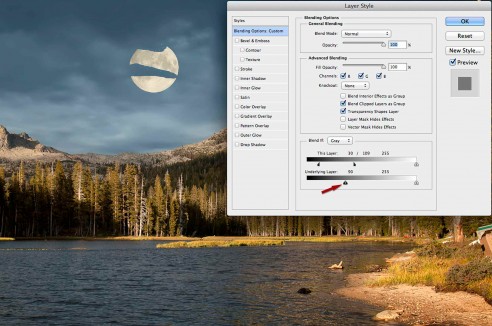
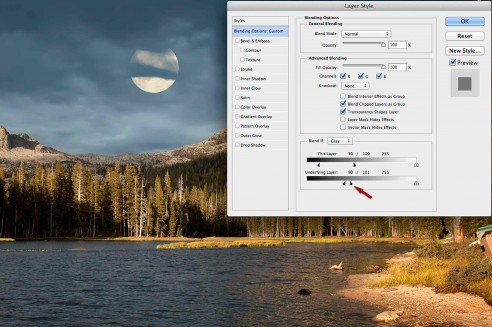
In the illustration above, you can see that I moved the left “Underlying Layer” slider to the right, and the value for this slider has changed to 90. This tells Photoshop that for the layers below the current layer, luminance values of 90 or lower should punch-through the current layer, and become opaque.
Fine-tune blending the clouds
Option+Click (PC: Alt+Click) and drag the right half of the slider you just moved to the right. This effectively splits the slider into two pieces. Continue to drag this half of the slider to the right until you get the effect you’re looking for, and click on OK to accept your changes.
Reposition the moon
Tap the “V” key to select the move tool, and drag the moon around in your image until you’re satisfied with its location.
If the clouds don’t look quite right after moving the moon around, re-open the Layer Style dialog box and readjust the settings in the Underlying Layer section.
Layer Styles changes are parametric—you can always revisit your changes in the Layer Style dialog box and modify them.
Knowing how to use the Photoshop blending options effectively can open a world of possibilities for you. I think you’ll find these options invaluable when you need to add a creative touch to your images.
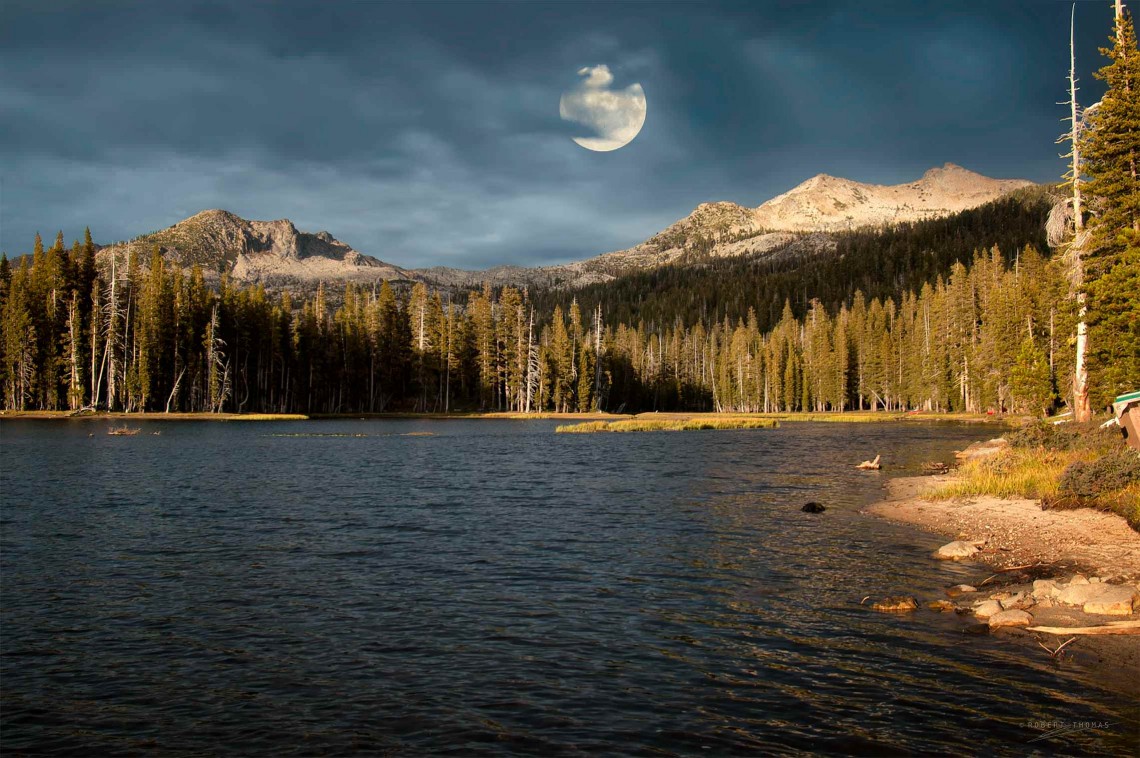
The final image with the moon

[poet-badge]
Excelente, muchas gracias por el valioso aporte
Excelente. Muchas gracias por el comentario!
Excellent! Great tutorial and explanation…I´ve also read your explanation of the Blend modes and is very well written and explanatory.
Thank you Jorge!
Wow, what a great source of Photoshop wisdom I found here!! Have to dig more here, thanks very much for sharing your knowledge.
Thanks for the comment Cathy!
Good and clear instructions.
I have just discovered your web site and as I am a new user of Photoshop your Tutorials are among the best I have seen on the web. Very clear instructions and a great help with the shortcuts.
Many thanks.
Thank you Chris!
Very good! Creative idea color!
Amazing! Thanks!
Hi, I’ve seen your completed photo with moon. but I think it will be better if you make some more darkness at the right side of this image because this effect is from sun I think not from moon 🙂
Thanks for your feedback Kate.
Every time I try to flatten the image I lose the effect of the moon behind the clouds. Is there a work around for that? I use PSCS6. Thanks.
Hi Allen. There’s no “trick” to flattening your image—just flatten as usual. It works fine for me in CS6. I can’t think of a reason why it wouldn’t work for you.
Instead of flattening the image, you could try merging the layers. To do this click on the top-most layer and use Cmd+Option+Shift+E (merges all layers and keeps the existing layers intact). Another option would be to use Cmd+Shift+E to merge all layers (and discard the original layers).
Robert, Would it be the same process if I wanted to add Dinosaurs into the photo? and birds and sea creatures? Thanks, I have a bride and groom that want me to put a T-Rex chasing them from behind.
Hi Michael. Generally speaking, the process would be the same. However it really depends on the images you’re working with. Regarding the image you want to place into your “bride and groom” photo, if the background of this image is similar to the subject, you may need to mask out the background. For example if the moon used in this tutorial had a white background, the adjustments made using the “This Layer” slider would probably have an impact on both the moon and its background (because both have similar luminosity levels—both are light colored). In this case I would need to create a mask and fill the background with a dark color (black). Another option would be to make the background transparent.
Dear Robert,
Great tutorial! I’m always scared of complexity of Photoshop, but you instructions made it so easy to do the trick. Following your instructions, I’ve made my photo of ‘supper moon behind tree leaves’. It’s amazing!
Many thanks again!
David
Glad to hear the tutorial helped you!
Thanks for the comment David!
Thank you for such an easy to understand tutorial
I’m new to photoshop but not new to the planet, nearly 70 years old now and this old timer grasped this task with ease due to teaching skills
Regards,
Gary
Excellent Gary!
Keep up the great work and thanks for the comment!
Well done…a very realistic photo effect, explained perfectly!
Thanks Crazy for Photoshop!
One of the hidden power of Photoshop.
Thanks for taking the time to explain things in such great detail in a way that is easy to understand.
Interesting tutorial but
«some of the clouds should be floating in front of the moon»
is quite a mystical concept. Coud you please explain in what circumstances any cloud could actually be behind the moon?
I see you don’t monetize photoblogstop.com, don’t waste your traffic,
you can earn extra bucks every month with new monetization method.
This is the best adsense alternative for any type of website (they
approve all sites), for more details simply search in gooogle:
murgrabia’s tools
Wow, such nice tutorial to watch. I found it very informative. According to me, it’ll be give better look if you use more darkness inside the moon and also keep some floating clouds surrounding the moon. However, I’ll definitely use these instruction in my won work as I found it very interesting. Thanks for sharing such nice tips. Please keep sharing more tips like this.
I am really grateful to be able to benefit from your knowledge. Very well elaborate photoshop tutorial thanks for sharing. keep up the good work.