The human eye does a great job of compensating for the dark and light areas in a high contrast scene. When these light or dark areas reach the extremes, we need to reach for a flashlight or dark glasses, but for the average high contrast scene, our eyes do a great job of automatically compensating. Today’s digital cameras are getting close to matching this dynamic range of adjustment/compensation, but they still have a long way to go. For example the human eye sees at about 11 f-stops, while digital camera sensors see only about 6 f-stops.
One technique to achieve additional dynamic range in our digital images is to capture a series of photographs at differing exposure levels (exposure bracketing), then combine them into one final High Dynamic Range (HDR) image during post processing. This “combined” image would then contain the best characteristics of the series of images.
HDR photography tips
When capturing images for HDR processing it’s important to remember the following guidelines:
- Always use Aperture Priority when bracketing (because you don’t want the DOF to vary).
- Use a small aperture, because virtually everything should be in focus. Of course if you are shooting portraits and you want the background blurred, you would shoot with a larger aperture.
- Typically use a wide-angle lens (the benefit of HDR is being able to take what your eyes see, and replicate that effect in a photo with a very wide dynamic contrast range).
- Use a tripod and shutter release cable.
- Lock the mirror and focus.
- Shoot with a “bow & arrow,” as opposed to a “shotgun”—be selective of the composition and camera settings.
- Don’t always bracket around 0EV. Sometime the shot calls for starting the bracketing above or below 0EV. Look for the trouble spot in your image. For example, if the trouble spot is the shadows under a bridge, and not the highlights in the sky, shoot the majority of your bracketed shots in the higher end (more plus bracketed shots), and less on the lower end.
- Use the lowest possible ISO. Any noise you introduce to your bracketed shots will be amplified during the HDR process.
- As contrast increases, so does the bracketing range (more contrast = more bracketed shots). For example, a photo with more highlights requires more minus bracketing, and one with more shadows requires more plus bracketing shots.
How many bracketed shots?
How many bracketed shots should you shoot? Some say 3 to 5, while others say 7 to 9. The answer really relies on the contrast of the scene you are trying to capture.
Using the sun’s position to determine how may bracketing shots to take.
- Toward the sun = High contrast, so capture more bracketed shots
- 90 degrees to the sun = Moderate contrast, so capture fewer shots
- Back to the sun = Low contrast, so capture even fewer shots
In this tutorial I’m using a series of images that were taken without a tripod (yes I know, I’m already straying from my guidelines). Because the images were taken in fast succession using the burst mode function of my Nikon D700 they’re still usable—I will however have to align them before processing for HDR.
The images
A total of 5 images were captured, each with 1/3 stop difference.

My post processing steps vary depending on the images I’m working on and the desired result. For example I may use Nikon’s Capture NX2 instead of Lightroom or Photoshop, or I may use HDRsoft’s Photomatix Pro instead of Nik Software’s HDR Efex Pro. Each of these tools have there benefits and caveats, but the bottom line is having flexibility and the tools you need to create the image your looking for.
Creating the HDR image
To create the HDR image shown at the top of this page, I processed my 5 RAW images in Lightroom 3 by first applying a custom DNG profile created using X-Rite Photo’s ColorChecker Passport. I then applied lens correction and sharpening. I didn’t need to make any other image modifications, however you may need to make other adjustments to your images.
Any sensor spots, noise or chromatic aberrations (CA) will be amplified during the HDR process, so it’s best to fix these problems before processing for HDR.
The steps
Load images into Photoshop layers
In Bridge select all of the images in the bracketed series, and select the option Tools > Photoshop > Load Files into Photoshop Layers.
Align the images
Once the images were processed in Lightroom, the hand-held images needed to be aligned. There’s a great Photoshop script called StackAlignCrop available on the Digital Outback Photo site that I use and recommend.
Prepare to align the images by exiting Lightroom and opening Adobe Bridge. In Bridge select all of the images in the bracketed series, and select the option Tools > Photoshop > Load Files into Photoshop Layers.
Once Photoshop settles down after opening all of the images as layers, confirm all layers are selected by using the keyboard shortcut Cmd+Option+A (PC: Ctrl+Alt+A) (or click on the top layer and Shift+Click on the bottom layer). Next select File > Scripts > StackAlignCrop. I recommend you don’t make any other changes to the images—just open them as layers, then immediately run the script.
Once the StackAlignCrop script is done processing the images, save the individual layers as separate files using File > Scripts > Export Layers to Files. In the export dialog box select a temporary location to store the aligned images—use the default file prefix or select one of your own, and select PSD for File Type (or use TIFF if you want). Select the options for “Include ICC Profile” and “Maximize Compatibility.” Click “Run” to begin the export process.

Click on OK after the export is complete.

Close the multi-layer file in Photoshop, selecting “Don’t Save” in the exit dialog box.

Assuming you have Nik Software’s HDR Efex Pro software installed, select the recently created/aligned images in Bridge, and open them in HDR Pro by selecting Tools > Nik Software > Merge to HDR Efex Pro.
Depending on the images you are working on, you will select some or all of the following options:
- Open as a Smart Object
- Alignment
- Ghost Reduction Method
Whenever possible I always work with Smart Objects because of their flexibility, so select the option to “Open as Smart Object.”
Because we already aligned the images with the StackAlignCrop script, you shouldn’t need to align the images, so deselect the option for “Alignment.”
Because there may have been a slight breeze when the photographs were taken, select the option for “Ghost Reduction Method.” I usually start with the settings of “Adaptive” and “Medium” as shown in the illustration below.
Detailed explanation of the HDR Efex Pro Options
Open as a Smart Object
Select this option to open the image as a Smart Object in Photoshop. Smart Objects are not specific to HDR images, instead they can be applied to all images in Photoshop since Photoshop CS2. I’ll write another post about Smart Objects in the future, but for now, suffice to say that a Smart Object remembers the file’s original properties. No matter what you do to a Smart Object in Photoshop, you can always open the file in it’s original state, that is to say, the state it was in before you made it a Smart Object. For example, you can use the Free Transform tool to make the image larger and save it. Then make the image smaller with the Transform tool and save it again. In doing this, you would see that the image retains it’s original quality. This is because Photoshop takes a “snap shot” of the original state of the file just before you converted it to a Smart Object—no matter what you do to the file, Photoshop will remember the original files state!
Alignment
Checking this box enables the alignment algorithm and causes HDR Efex Pro to attempt to align images where the camera may have shifted during image capture.
Ghost Reduction Method and Drop Down Menu
Checking this box enables the Ghost Reduction algorithms, which attempt to remove artifacts created by objects moving within the image series. Select the appropriate method based on the type of image detail moving within the image series:
Global
Designed for image series that have large objects moving within the image, such as people and cars.
Adaptive
Designed for image series in which small objects or textured objects, such as trees, clouds, or water, were moving in the image series.
Ghost Reduction
It is recommended to start with the Ghost Reduction method that is appropriate for the image series with the Medium setting and review the image. If there are still signs of moving elements, try using the High setting. In some rare situations the Low strength option may be needed in order to reduce unwanted artifacts created by the Ghost Reduction algorithm. Alternatively if unwanted artifacts are visible, try using the other Ghost Reduction method.

Click on “OK” to open HDR Efex Pro.
Set Exposure Values
Because we used the HDR Efex Pro Photoshop plugin instead of the HDR Efex Pro Lightroom plugin, the following dialog box will appear. Select the appropriate EV stepping value, and confirm the EV steps are correct for all images. Click on “OK” once all of your settings are correct.

Select a preset
Once HDR Efex Pro finishes processing the images, the main HDR Efex Pro window opens. Here you can select from a variety of built-in presets, which are a great starting point towards the look you are trying to achieve. For the image in this tutorial, I selected the “Vintage Colors” preset, which can be found under the “Surreal” preset category. While you can make numerous modification in this dialog box, I chose the default setting for the preset and clicked on “OK.”

Editing the HDR effect
If you feel you would like to try different HDR settings on your file, you can double-click on the HDR Efex Pro Smart Object in the layers panel (this is the one of the benefits of selecting the option of opening the image as a Smart Object).

Convert from 32bit to 18bit or 8bit
For the image I’m working on, I’m going to apply other Nik Software enhancements. However before doing so, the image needs to be converted from a 32 Bits/Channel image to a 16 Bits/Channel or 8 Bits/Channel image. I almost always work with 16 bit images, so to convert the image to 16 bits in Photoshop, select Image > Mode > 16 Bits/Channel.
You will probably get a Photoshop message notifying you that some filters may not work properly in the converted document depth. This is just telling you that you won’t be able to make any further 32 bit image adjustments once the image is in a mode other than 32 Bits/Channel. Select “OK” to continue.

Another Photoshop dialog box will appear prompting you to either “Merge” or “Don’t Merge” the layers in the Smart Object. Select “Merge” and click on “OK” to continue.

Once the layers are merged, the Photoshop HDR Toning dialog box will appear. To avoid tone mapping the images a second time (HDR Efex Pro already did this), you would typically select the option “Exposure and Gamma” from the “Method” drop down menu. However for this image I intentionally selected the default option of “Local Adaptation.” This is because I found this option gave this particular image some extra “punch.”
Description of Tone Mapping Options
Local Adaptation
A local operator that preserves local contrast by applying a spatially varying tone mapping algorithm.
Equalize Histogram
A global operator that compresses the dynamic range while preserving image contrast. No options are available for this method.
Exposure and Gamma
A global operator that allows you to “Manually adjust the brightness and contrast of the HDR image”.
Highlight Compression
A global operator that compresses the highlights to fit within the dynamic range of either the 8 or 16 bit output you select. There are no options available for this method.
The Tone Mapping options you would normally select when working with the Nik Software HDR Efex Pro plugin.

The atypical tone mapping selections I used for this image.

Click “OK” to complete the conversion to 16 bit.
HDR File Naming Conventions
At this point I saved the 16 bit image as a Photoshop PSD image using a special naming convention that includes the starting file name and ending file name of the bracketed shots that were merged to HDR. For example if I used the following file names for the HDR merge:
_DFX3929
_DFX3930
_DFX3931
_DFX3932
_DFX3933
The name I would use for the final HDR image would be:
DFX3929-DFX3933_HDR.psd
I highly recommend you select this or a similar naming convention for your final HDR images, because years from now you may need to know exactly which images you used to create the HDR image.
Once the 16 bit image has been saved as a PSD file with the proper naming convention, I began my other post processing tasks by converting the image to a Smart Object. To convert the image to a Smart Object, right-click (or Option+Click) the layer just to the right of the layer name, and select the option “Convert to Smart Object.” I won’t go into too much detail on the other changes I made in Photoshop using the other Nik Software tools, but here’s a brief recap of the other changes:
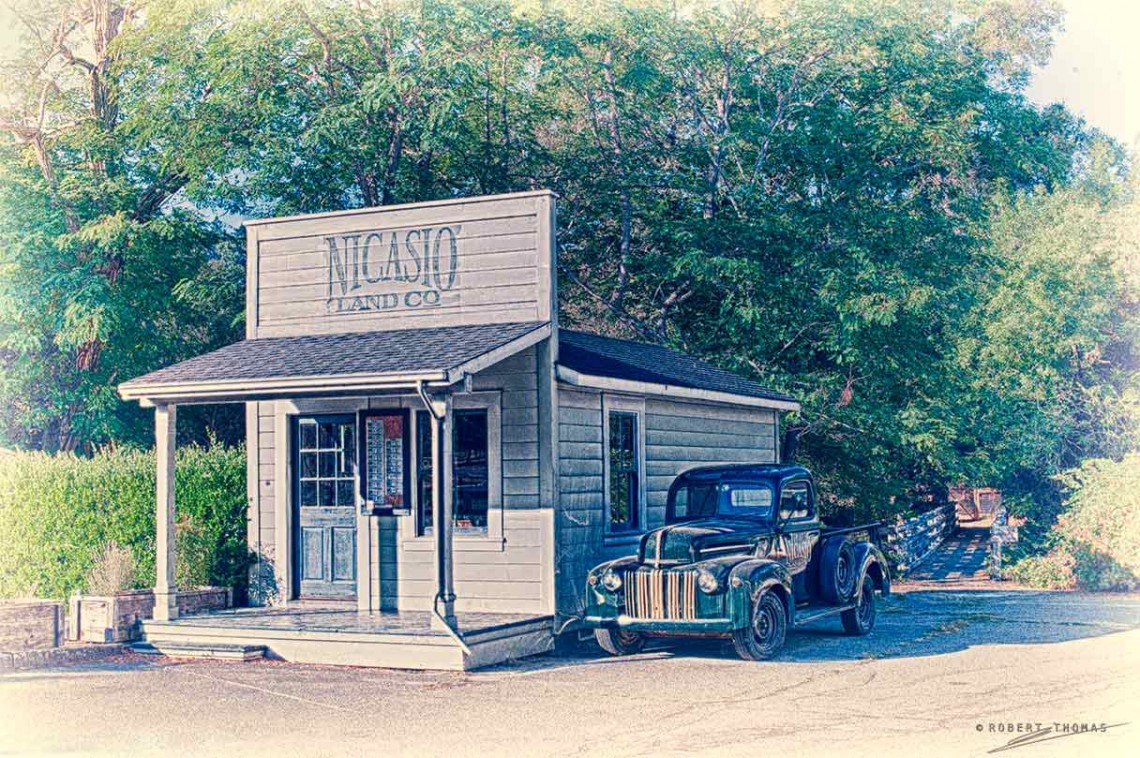
- Viveza 2 to add some structure to the entire image; added some warmth to the tree bark on the left of the image; brought out some additional structure and warmth in the truck’s grill.
- Color Efex Pro 3 “Brilliance/Warmth” to add some additional punch and warmth to the image.
The final image

Capturing multiple exposure images for HDR processing is a great way to increase the dynamic range in your images. HDR images also allow for a wide range of artistic leeway—you can make your HDR images realistic, so they appear more like what the human eye would see, or they can wildly artistic.
[poet-badge]
Great article, which I was reading for several reasons. One in particular which remains a mystery to me is fine focusing for bracketed shoots. I have been using manual focusing which has given me reasonable results. I spent a couple of days trying to understand my D700 focusing better and I really like the zooming in on Auto (using the green indicator) or on manual to really fine tune the focus. However, once I have the focus where I want it in the test shot I want to lock it in for both position and level of focus and use it for the subsequent brackets but I can’t work out how to do this? Do you lock your focus for bracketing? What is the best approach for great consistent focusing across each bracketed shot?
Cheers Gary.
I usually just set the focus-mode selector to manual (M) and manually focus on my subject; as long as I don’t touch the lens focusing ring the focus is effectively locked. You can however lock the focus on the D700 by using the FUNC button, Preview button, or the AE-L/AF-L button, provided you configure one of these buttons for “AE/AF lock” or “AF lock only.”
The focus-mode selector is one of the switches on the D700 that’s worth memorizing. Once you’ve memorized this selector, you should be able to switch between (S), (M), or (C) without looking, and you won’t have to configure any of the other buttons to perform the focus lock.
Glad you enjoyed the article!
nice article! but, you might want to define “hdr” for newbies? high dynamic range.
thanks!
The HDR acronym is now defined in the article. Thanks for your feedback!
Thanks for this nice article.I like the post.